Update 04/05/2021: This method has been improved and found here.
The following covers a method for visualizing a complex vector tile dataset using a static server. This particular blog is more for beginners and reduces the technical terms as much as possible. I wouldn’t recommend this method for large complex vector tile data sets, but instead for quick one-off sites that are looking to incorporate a small number of vector tiles where the GeoJSON might be too large/complex to handle.
If you just want to skip to the map and code, visit the Github page created for this blog.
Here is the big reveal at the beginning. If you want to serve a basic vector tile locally or with a static server:
- Create an tile cache with uncompressed .pbf files
- Place that tile cache on something like GitPages, e.g. embed the tile cache directly along with your website or embed the cache on your localhost along with the other site files
- In Leaflet, access the tile cache using ‘L.vectorGrid.protobuf()’
If you’d like to read more in depth:
I work on a Ubuntu OS; however, the methods below will just as easily work with iOS and Windows environments. The parts for building the site, e.g. the HTML, JS, CSS and GitPages, are OS agnostic.
If you want to follow the steps outlined you will need to have installed:
- GDAL: I am only including this since I used GDAL to extract the contours from the original elevation file.
- OGR2OGR: Easy tool for converting your shapefile to GeoJSON.
- Tippecanoe: Excellent tool for generating your tile caches in Web Mercator.
- T-Rex: Necessary for building your tile cache in a custom projection like NZTM. I tried a number of methods and T-Rex seemed to work best. Sadly, as of Nov 2020, ogr2ogr cannot currently create an MVT in NZTM projection, but it can do projections where the resolutions are halved at each zoom level.
- Leaflet: Your friendly JS library for building your map in a web environment.
- SimpleHTTPServer: if you’d like to do localhost testing, you can run your site with this.
You will also need a Github account and a basic knowledge of building a webpage .
Here are the two stacks depending on your needs:
- Web Mercator: GDAL, OGR2OGR, Tippecanoe, Leaflet, GitPages
- NZTM: GDAL, OGR2OGR, PostGIS, T-Rex, Leaflet, GitPages
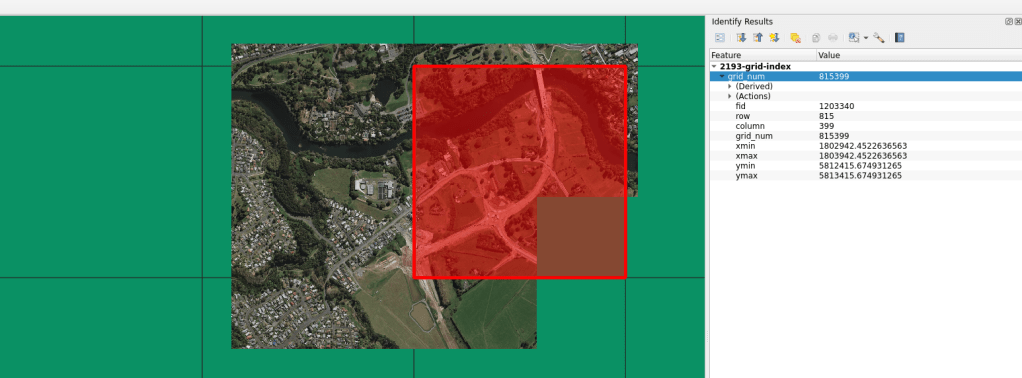
The basic premise is this: with your vector file, you need to construct a tile cache with uncompressed PBF files. The tile cache is the same as any XYZ tile cache you would use for raster tiles, except you are filling it with .pbf files. That tile cache will need to reside in a location accessible by your Leaflet application. In this example we are using GitPages as our server and embedding our tiles directly along with the website we built. Technically, Gitpages is acting as the server. If you are testing and serving on localhost, just embed your tile cache with your web files.
I am going to keep the code light for this blog and instead layout the steps. You can find full code examples in my Github repository here.
Building Your Own Contours
Download Elevation in NZTM
https://data.linz.govt.nz/layer/53621-wellington-lidar-1m-dem-2013/
If you download the entire dataset, you can create the contour lines from the VRT. This saves a lot of time by not creating a mosaic.
Build VRT
gdalbuildvrt dem.vrt *.tifContour (@ 50m intervals)
gdal_contour -a elev -i 50 dem.vrt wellyDEMContour.shpWeb Mercator Tile Cache
If you are building a Web Mercator site, you can use Tippecanoe to render the tile cache. You need to create a GeoJSON of your shapefile first
Shape to GeoJSON
ogr2ogr -f GeoJSON -a_srs EPSG:2193 -t_srs EPSG:3857 wellyDEMContour.json wellyDEMContour.shpTile JSON
tippecanoe --no-tile-compression --projection=EPSG:3857 --minimum-zoom=12 --maximum-zoom=16 --output-to-directory "static.vector.tiles/contoursWebmer" wellyDEMContour.jsonNZTM Tile Cache
If you are building an NZTM site you will need to use T-Rex to generate the NZTM tile cache for the vector tiles. T-Rex likes best if you can give it a PostGIS table to work from. I’d also recommend simplifying complex contour data sets. Your tile generation will be much faster.
Upload to PostgreSQL (you can upload the original NZTM shapefile)
shp2pgsql -s 2193 wellyDEMContour_NZTM.shp public.contournztm | psql -h localhost -d dbName -U userNameT-Rex Config
See full config here
Note the tile size you are setting. You will need this later for your Leaflet application
[grid.user]
width = 4096
height = 4096
extent = { minx = -1000000, miny = 3087000, maxx = 3327000, maxy = 10000000 }
srid = 2193
units = "m"
resolutions = [8960.0,4480.0,2240.0,1120.0,560.0,280.0,140.0,70.0,28.0,14.0,7.0,2.8,1.4,0.7,0.28,0.14,0.07]
origin = "TopLeft"
T-Rex Tile Cache
t_rex generate --progress true --maxzoom=12 --minzoom=9 --extent=160.6,-55.95,-171.2,-25.88 --config /static.vector.tiles/trexConfig/configpsql_contour.tomlDecompress PBF Files
find . -type f | xargs -n1 -P 1 -t -I % gzip -d -r -S .pbf %
find . -type f | xargs -n1 -P 1 -t -I % % %.pbf
Important bit for Leaflet
See the GitPages site for how to set up the Leaflet JS in NZTM
// Access the tile cache
var vector = L.vectorGrid.protobuf(vectorURL, styles);
Have fun!